 da
da de
de es
es fr
fr it
it nb
nb nl
nl pt
pt sv
sv fi
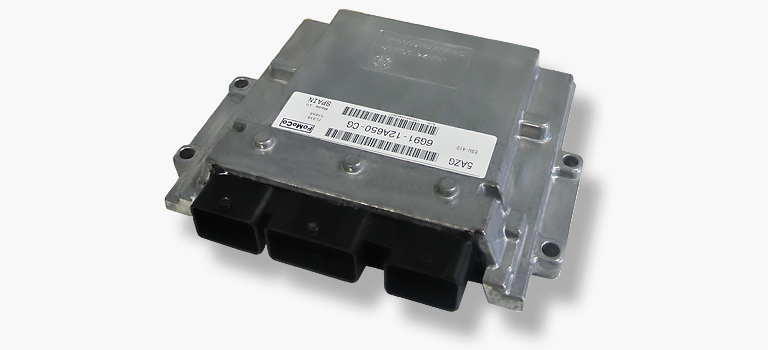
fiFoMoCo ESU 411

“A special solution deserves a special approach. Therefore, we immediately begin with explaining the best part of this new remanufacturing solution for the FoMoCo ESU XXX: replacing the BGA onto the PCB!”
Probably over 80% of all people will quit reading sooner or later if we continue to write in this way, so maybe it’s better to fi rst explain what we’re actually talking about… The FoMoCo (or Vistion) ESU-411 we were just talking about is an ECU (Engine Control Unit) from Ford. This ECU can be found in cars with 1.8L and 2.0L Duratec engines, such as the Focus II DA3 and the C-Max. You can also fi nd them in certain types of Volvo, such as the C30. Although these engines have a decent reputation, some malfunctions can still occur, especially within the ECU. Fortunately ACtronics now has a solution for these ECU defects.
What’s causing the main malfunctions?
We’re happy to tell you that the list of common failures for this type of ECU is not that long. Only two complaints occur regularly.
One of these common complaints is a failing ignition control. Symptoms range from a single error to complete failure of the whole ignition system. This complaint is indeed a malfunction within the ECU itself and can be fixed.
The second complaint we frequently hear about is a malfunctioning throttle body control system and it’s exactly this fault for which the new remanufacturing solution is intended. Inputs from the throttle pedal no longer reach the throttle body which makes the throttle totally unresponsive. There are also known cases where the fault isn’t always present. In that case, the throttle
appears to be responding well for a longer time, until the vehicle fi nally falls into limp mode.
These are the main fault codes you’ll fi nd when reading out the ECU:
- P0403 – Exhaust Gas Recirculation Circuit Malfunction
- P0607 – Control Module Performance
- P1585 – Throttle Control Unit Malfunction
- P2008 – Intake Runner Control Circuit Open Bank 1
- P2110 – Throttle Actuator Control System
- P2121 – Throttle / Pedal Position Sensor / Switch Circuit Range / Performance
It’s hugely important to make sure all other components are working properly fi rst, before focussing on the ECU itself. EGR (Exhaust Gas Recirculation) valves for example tend to cause several complaints and electronically controlled throttle bodies are known for occasionally causing interferences, so it isn’t always the ECU that’s malfunctioning.
Here’s a heads-up: If you’re reading out fault code P2008, check the solenoid of the intake runner fi rst. This solenoid can be found on a vacuum hose, which is located next to
the intake manifold.
But when the problem originates in the ECU itself, it’s wise to get the ECU for repaired. We’ve developed a brand new method for remanufacturing these particular ECUs.We’ve found that the main processor causes all these problems and it’s that specific component that needs to be replaced. However, it’s not easy to simply replace it for a new one. We’ll explain how it’s done in the next section.
Remanufacturing: the process
The FoMoCo ESU-411 immediately requires all our ingenuity upon entry. How do you open this ECU neatly when the outer case is made of a solid block of metal? Fortunately, we have a modern milling facility where we have all the required equipment to deal with this issue professionally. We’ve also developed our own cover which perfectly closes the resulting gap. This ensures
the reliability of the remanufactured product once it has ungone the whole process.
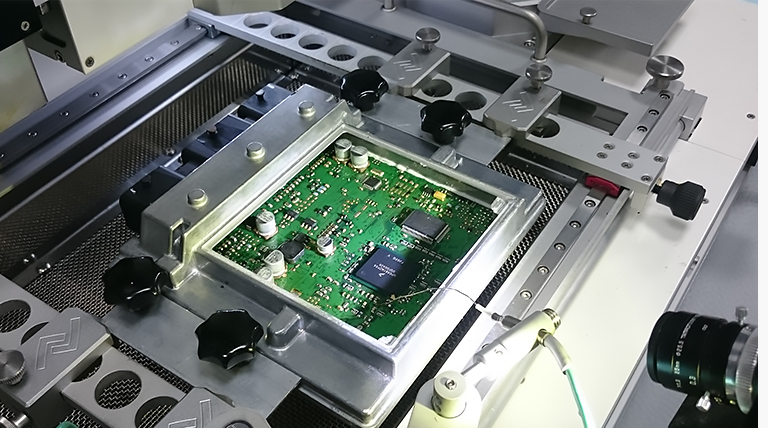
Once we’ve opened the ECU, we have access to the PCB. PCB stands for “Printed Circuit Board”, which explains why this abbreviation is often used to refer to this component. The processor is soldered directly onto the PCB, but it isn’t an easy job to remove this device. As many as 388 tiny contacts are holding the processor onto the PCB and desoldering is made utterly impossible by the fact that many of those contacts are placed beneath the processor and therefore out of reach. So let’s bring out the professional equipment for this job.
Fun fact:
The orientation of all those contacts at the bottom of the processor is called “Ball Grid Array”. For this reason, such a type of processor is often called “BGA”: A processor that is equipped with a Ball Grid Array.
The specialised equipment we’re using for this remanufacturing process, is our new pride and joy. This new machine is able to heat up a certain area of the PCB very accurately. It then causes the solder joints below the processor (BGA) to melt for a short period of time. At that precise moment the machine is able to remove the old processor (BGA). This process may sound very simple, but the exact programming of variables such as type of compound, material thickness and heating area are a huge challenge. Moreover, this requires a lot of expert knowledge.
Once the BGA has been removed from the PCB (Now it’s clear what we’re talking about right?) the old tin needs to be removed. We also need to prepare the surface of the PCB before the new processor can be installed. This is still a manual labour process, but fortunately we have an excellent team of skilled people working at ACtronics. After this manual cleaning process is complete, the ECU is placed back into the machine in order to continue the remanufacturing process.
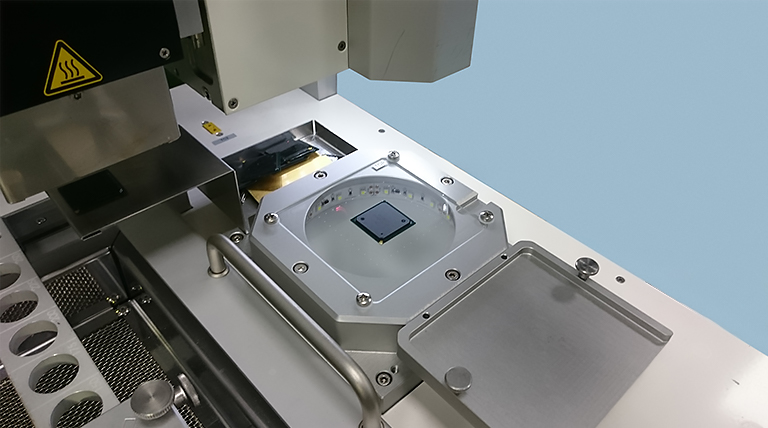
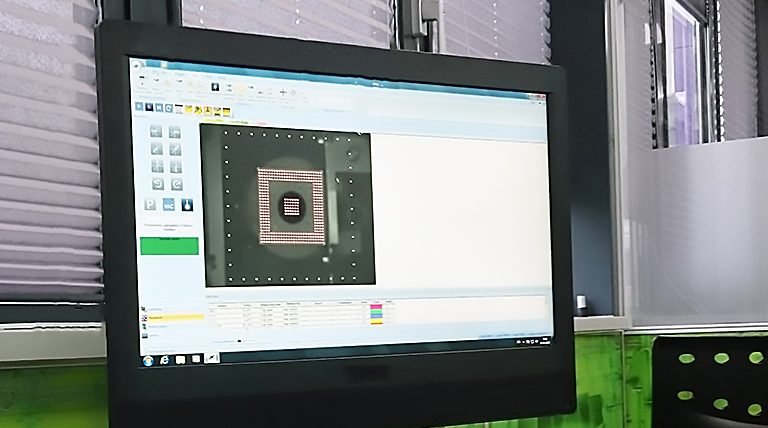
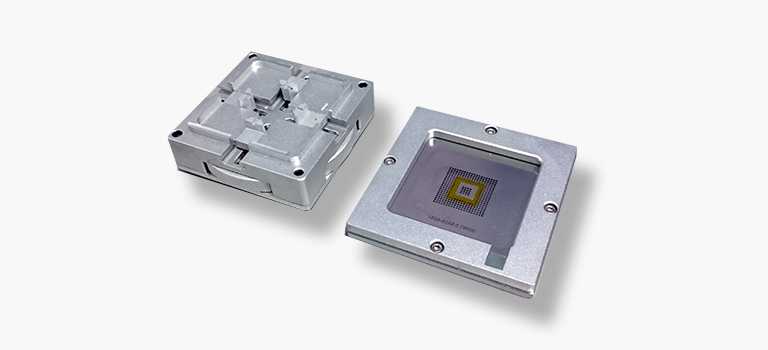
In this part of the remanufacturing process the new equipment is hugely important. Everything depends on the precise replacement of the new BGA. The machine has a camera, which takes a digital photo from the ball grid array of the new BGA. Thanks to digital image processing, the machine recognizes all 388 contacts on the BGA. This digital image is then made visible on the screen. After this, the machine also takes a digital photo of the PCB itself. This allows the machine to match the grid positions from both images together and therefore it calculates how the BGA should be placed back onto the PCB. Once the position has been determined, an automatic arm places the new BGA exactly in the right position. It really doesn’t matter if we’ve placed the BGA askew into the machine, because the arm automatically corrects this.
But we almost overlooked one step of the process: Isn’t there any tin needed in order to secure the processor onto the circuit board? No, we’ve invented a special solution for this matter. We’ve made a perfectly fi tting case for the BGA that is equipped with a grid where we can place small beads of tin. Once all beads are applied the whole area is heated. This allows the beads to melt accurately onto the BGA. The BGA is now ready for placing onto the PCB.
Once the BGA is neatly placed in the right position, the heating process begins. The tin on the bottom of the new BGA starts to melt and if you watch this process closely you’ll see the tin connecting to both the BGA and PCB. Eventually the BGA starts to drop down onto the PCB. After a cooling period the ECU is re-tested. Once this test is passed, the new cover is placed into position. Now the ECU is ready to go back to its owner.
Video
We have also made a special video that shows the complete remanufacturing process step by step. It also contains a clear view on replacing the BGA. Would you like to see this video?